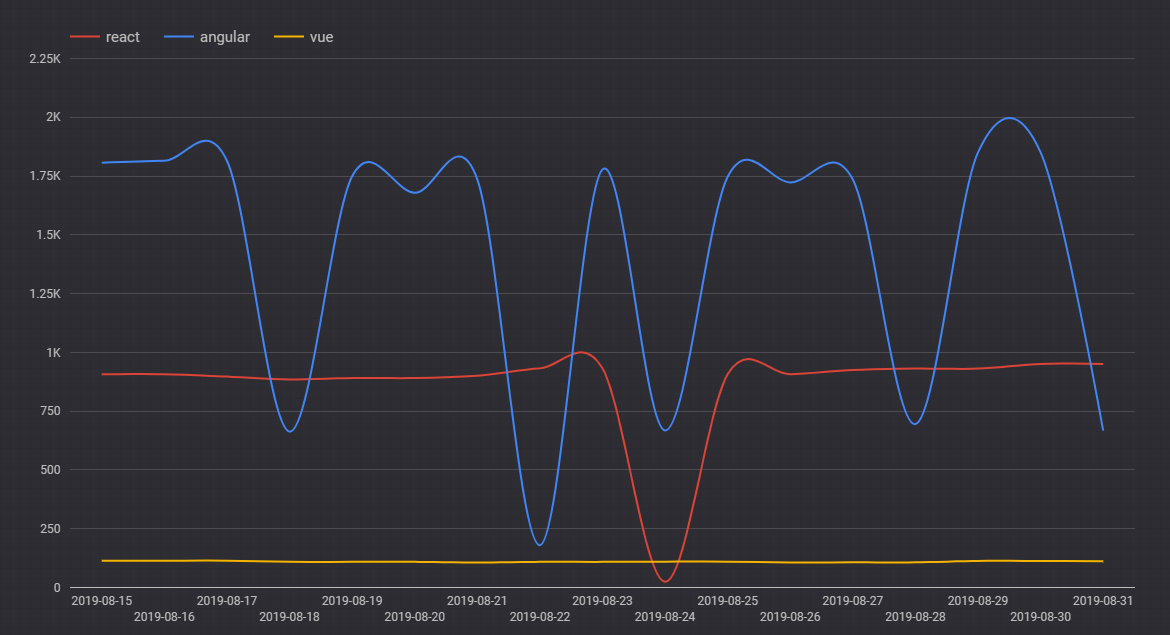
Live : UI Framework job trends in Hyderabad
Live trending of UI framework jobs in Hyderabad achieved using Google App Engine, Google Cloud SQL, Google Data Studio and Python

using Google App Engine, Google Cloud SQL, Google Data Studio and Python (wait for the embedded graph to load below)
I was trying to practice my python programming skills and decided to write python cron jobs. I realized that if I have to run cron jobs then I need server to host these cron jobs and configure them to run. Then I looked up Google cloud for a cloud service to run cron jobs. I realized that I can use Google App Engine to create and host my cron jobs.
To start with, I downloaded the Google Cloud SDK in order for me to write the program on my desktop, test it and then deploy on the Google Cloud when it is ready. You should download the Google Cloud SDK and configure it.
My project folder consists of 3 main files. app.yaml that holds the app configuration. cron.yaml that holds the cron frequency & other related info and main.py that has the main program. This may not be most efficient way of doing what I tried to do. Now that I know how to do it, I would love to make it more efficient and more compact.
app.yaml
runtime: python27
api_version: 1
threadsafe: yes
service: vue-scrape

libraries:
- name: lxml
  version: 3.7.3
- name: MySQLdb
  version: 1.2.5

handlers:
- url: .*
  script: main.app

env_variables:
    CLOUDSQL_CONNECTION_NAME: xxxxxxxxxxxxxxxxxxxxxx
    CLOUDSQL_DSN: mysql:unix_socket=xxxxxxxxxxxxxxxxxx
    CLOUDSQL_USER: root
    CLOUDSQL_PASSWORD: xxxxxxxxx
cron.yaml
cron:
- description: "angular scrape job"
  url: /angular
  target: angular-scrape
  schedule: every 24 hours
- description: "react scrape job"
  url: /react
  target: react-scrape
  schedule: every 24 hours
- description: "vue scrape job"
  url: /vue
  target: vue-scrape
  schedule: every 24 hours
main.py
import logging
import urllib
import urllib2
from google.appengine.api import urlfetch
import webapp2
from lxml import etree
from StringIO import StringIO
import os
import MySQLdb
from datetime import datetime

CLOUDSQL_CONNECTION_NAME = os.environ.get('CLOUDSQL_CONNECTION_NAME')
CLOUDSQL_USER = os.environ.get('CLOUDSQL_USER')
CLOUDSQL_PASSWORD = os.environ.get('CLOUDSQL_PASSWORD')

def connect_to_cloudsql():

    if os.getenv('SERVER_SOFTWARE', '').startswith('Google App Engine/'):
        cloudsql_unix_socket = os.path.join(
            '/cloudsql', CLOUDSQL_CONNECTION_NAME)

        db = MySQLdb.connect(
            unix_socket=cloudsql_unix_socket,
            user=CLOUDSQL_USER,
            passwd=CLOUDSQL_PASSWORD)

    else:
        db = MySQLdb.connect(
            host='127.0.0.1', user=CLOUDSQL_USER, passwd=CLOUDSQL_PASSWORD)

    return db

class UrlPostHandler(webapp2.RequestHandler):
    def get(self):
        try:
            headers = {'Content-Type': 'application/x-www-form-urlencoded'}
            result = urlfetch.fetch(
                url='https://www.xxxxxx.com/vue-jobs-in-hyderabad', #replace with job site of your choice
                method=urlfetch.POST,
                headers=headers)
            parser = etree.HTMLParser()
            tree   = etree.parse(StringIO(result.content), parser)
            if result.status_code == 200:
                self.response.write(result.content)
                logging.info(tree.find('.//title').text.split("-")[1].split(" ")[1].strip())
                db = connect_to_cloudsql()
                cursor = db.cursor()
                cursor.execute("INSERT INTO `cityjobs`.`jobtrack`(`tech`, `city`, `logdate`, `count`) VALUES ('" + "vue" +"', '" + "hyderabad" +"', '" + datetime.today().strftime('%Y-%m-%d') + "', '" + tree.find('.//title').text.split("-")[1].split(" ")[1].strip() + "');")
                db.commit()
                cursor.close()
                db.close()
            else:
                self.response.status_code = result.status_code
        except urlfetch.Error:
            logging.exception('Caught exception fetching url')

app = webapp2.WSGIApplication([
    ('/vue', UrlPostHandler),
], debug=True)
Once you have the code setup on the your desktop, you can start testing it using Google Local Development Server. Using this you can check if your code is going to work fine once it is deployed.
In my case, I created three different services for each of the frameworks ( as I said may not be efficient way of doing it) and then I created one cron.yaml that schedules all the services. For the purpose of the this code to run, I had created a Cloud SQL project with MySQL as the DB of choice and created a table based on the info that I wanted to record. Once the code is ready and tested locally, I first deployed each service by gcloud app deploy. As you can see, I had to make changes in the main.py as well as app.yaml before I deployed the service for each framework. Then I used same gcloud app deploy cron to deploy cron.yaml. As you keep deploying, you can verify the deployed service / cron on your Google Cloud console.
Once I have the data pumping into my Cloud SQL db, I created a data visualization using the Google Data Studio. You can connect to you db and plug-in the table that has the values. With a bit of trial & error, I got the graph view that I wanted.
I had fun building it. Happy coding.
I have interests in Alexa, Angular / AngularJS, NodeJS, Ethereum Blockchain, ChatBOTS and many more. Read more at http://www.dudistan.com/
